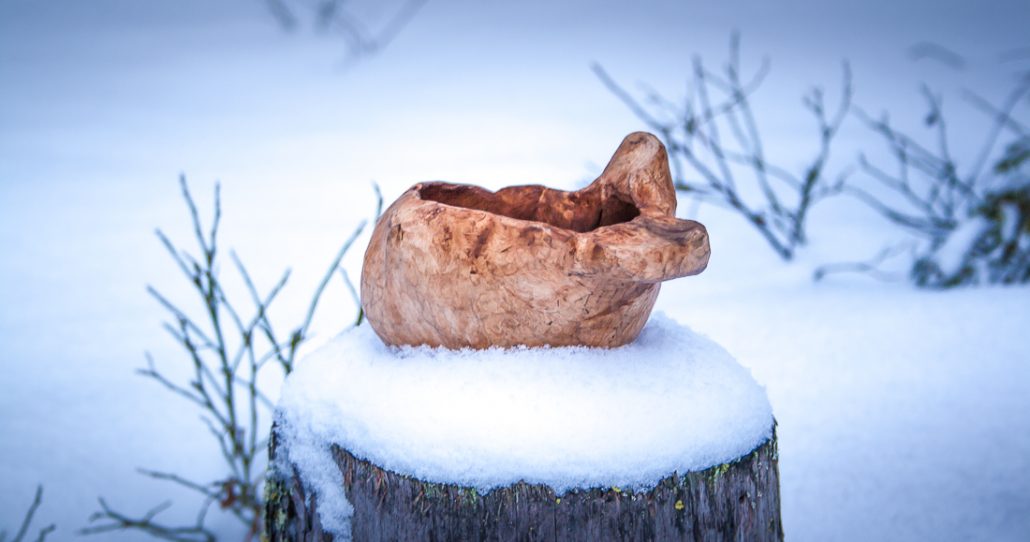
Kuksa – Crafting the traditional wooden cup
So what is a kuksa and what’s so special about it? It is a wooden cup that has almost sacred status among traditional hikers, bushcrafters, fell-goers and so on. Many claim that it actually originates here from Finland but I think it would be safer to say that it has Nordic origins. The saying goes something like this way, that every self-respecting outdoorsman should craft their kuksa by themselves and that the only acceptable material for kuksa would be birch burl.
During my earliest outdoor years I slowly grew to kinda embrace this legend about self crafted kuksas, but this doesn’t mean that I position myself above others as some kind of “real outdoorsman”. I don’t mean to disrespect anyone who decides to go with their plastic cup, an enamel mug, a ready-made kuksa, or whatnot. I see this more like my own personal maturity rite as an outdoor adventurer and less like “the only real way” of doing outdoorsy things. There just isn’t one right way of enjoying outdoors and it also applies to kuksa, no matter what that old bearded outdoor crank or some internet warrior tells you about the only right way of blah blah.
But this text isn’t about the deepest depths of the philosophy of kuksa or outdoors itself. Instead this is a short story of how a not-so-handcraftsman (read: me) made his first own kuksa to give his adventures a little more feel on a personal level.
The background and the “why?”
So as I mentioned I grew to embrace the legend that every outdoorsman should make their own kuksa by themselves. This made me decide that if I some day got a chance to make my own birch burl kuksa I would take that chance. I started my outdoor activities with those cheap ‘o’ timber-made mugs which I bought when I was in army but I never really liked them because a cheap wooden mug made of random piece of timber is just that: unauthentic, heavy and generally poor. Instead a self made kuksa would only be heavy and poor but absolutely authentic! It’s a freaking self-made birch burl kuksa, think about it. It would have the right feel to it and so it would be “justified weight” in my backpack. But until I would come across with such a noble, precious and rare material as birch burl I decided I wouldn’t carry a wooden kuksa with me, so I threw those timbermugs to the corner and took a lightweight but oh-so-soulless plastic cup with me whenever I ventured the great outdoors. Then I just waited for the day I would possibly find a birch burl to make my own kuksa.
Even though I’ve always known that there isn’t one right way of, for example, crafting a kuksa, I wanted to track down the most agreed-on authentic and traditional way of crafting one. Unfortunately the definition of a “real kuksa” is a bit vague as there are about as many definitions for it as there are people who own a kuksa. However if we put aside this “freedom of choice” in kuksa making, which basically gives you the freedom to define your own kuksa carved of a dried up elephant turd being as authentic as any other, many kuksa enthusiasts agree about the only acceptable material for making a real kuksa: the birch burl. Many also agree on that when someone is about to manufacture a real kuksa by themselves they should forget about using pieces of randomly selected board wood, modern power tools and their common sense. These kuksa making basics considered as somewhat traditional are the guidelines that I felt good enough with, so my aim was clear. The only problem here was that the birch burl suitable for making a kuksa is about as rare as hens’ tooth (“suitable” meaning a burl about the size and shape of a kuksa including the handle) and should you anyhow happen to encounter a birch burl, one or more of these apply….
- The burl is too fresh. It needs to dry up over a summer or two, but preferably three
- The burl is dry as lecture in history but it has a crack you could fit your mortgage into
- The burl is too big / too small / too deformed / too “not kuksay”
- The burl is attached to a tree and you’re too broke to own the forest where the said tree is located in. Therefore you don’t have the permission to cut it off the tree it grows in (or at least this is how the legislation goes here in Finland, look for “freedom to roam” or more specifically “finnish everyman’s right”)
- You get a permission of the owner of the forest to cut the burl off of the tree. This is when you realize the burl is actually 17 meters high in the tree. Damn. If the forest isn’t going to be raped and leveled tomorrow for the sake of forestry / industrial purposes you can forget about asking a permission to take the whole tree down for a “one stupid burl”.
- Bonus: There’s the thing called Salix caprea root burl, which is even more appreciated material for kuksa, but also – if possible – even more rare. After all you theoretically CAN find a birch burl, and some even have found, so that’s pretty boring and everyday’ish stuff when compared to burl in Salix caprea’s roots. These things appear like once in a millenia during the fifth full moon in the roots of that one specific Salix caprea located exactly in the middle of nowhere, Lapland. Ingest this, cry and admit to yourself that there is no way of finding the rarest of rare, the Salix caprea root burl. Be happy if you ever encounter a proper birch one. However if you ever happen to beat the odds with Salix caprea root burl consider filling a lottery coupon.
Anyway I managed to avoid all of these great filters ending up hitting a jackpot when in the summer of 2015 a friend of mine said that they’ve had this one birch burl at his parents’ garage for almost 30 years. Damn, that’s longer that I’ve even existed at this point. Anyway his father had found it three decades ago but neither of my friend or his father had any actual interest in making a kuksa out of it so they generously donated the burl to me. How convenient that the lump was somewhat a size of a kuksa and though it was dry, it didn’t have even one slighest crack in it! It was this real stroke of materialistic luck that gave me a possibility to try what kind of kuksa would I find inside of a real birch burl.
The crafting begins with all the chiseling
As soon as I got to a better space for woodcrafts than a block of flats I started gathering the tools needed for the job. As my idea was to keep the process as traditional as I could I wasn’t going to use drill presses or modern power tools. Here’s the weaponry I used in 99 % of the battle against the hard wood.
- A gouge
- For the actual chiseling work
- I used size 16 mm and it worked fine
- More pricey I’d think. My wallet hurts
- A puukko -knife (Marttiini Kaamosjätkä)
- For rough finishing
- “This thing really needs sharpening”
- A small fine carving knife (Mora Wood Carving 120),
- Small-bladed precision carving knife
- For actual finishing touches of the outerior
- A curved hollowing knife (Mora Wood Carving 162)
- A.k.a. spoon making knife
- Resembles a question mark made of carbon steel
- For finishing the interior of the kuksa
- Other equipment
- A hammer for chiseling if you don’t mean to stab the burl with the gouge until it turns into a kuksa (pro-tip: don’t). A good ol’ carpenter’s hammer will do.
- A good-sized vise to hold the burl in it’s place. A burl bouncing around your garage after every hammer strike can be a little annoying.
- Hearing protection of some kind. Thousands (yeah…) of hammer hits will make your ears ring. Also with hearing protection you can’t hear your neighbor screaming for you to stop the kuksa-making madness.
- Safety goggles. Usually you remember the need for protective eyewear when you’re digging the first chunk of wood out of your eye. Just like I did.
- I also had to use a carpenter’s saw, some sandpaper (+ a piece of flat wooden board and a stapler) and hand-fitting pieces of hard wood. More of these later on.
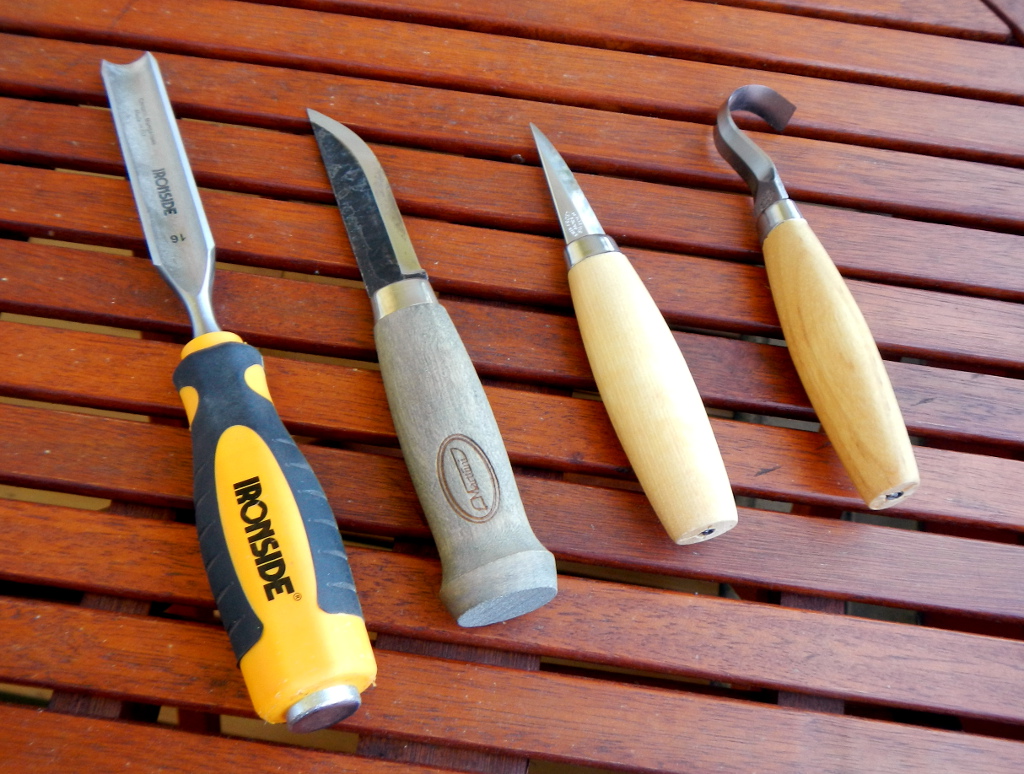
The lineup
The first step of the actual work was to cut the excess branch off of the burl. For this I used the carpenters saw.
It had been a long time since I last used a gouge for real so the first hour or two went by just relearning to use the tool effectively. I had little problems as the burl itself had a different opinion in turning into a kuksa. This forced me to go all medieval on it, but even though the burl had a protective bark on it’s surface I still wasn’t feeling too sure about having to use so brutal amounts of force. Unfortunately there just wasn’t any other way: A dry birch burl can be as though as Clint Eastwood’s face so I really had to chisel the sh*t out of it (the burl, not Clint’s face). Chiseling was the only way to work with dry burl because the so-called organic, pliers requiring, “rip and tear” -method that your dentist uses on you works in kuksa-making only if the fibres of the burl are fresh and moist. This organic ripping method is an exception to the rule that the processed burl should be dry. I have no experience in this kind of organic kuksa crafting, but I hope I would get to try it some day too.

First bites
After a few first centimeters of hollowing a doubt crossed my mind. The chiseling of the interior part is made in respect to the outer surface of the burl. Okay, this is pretty clear for anyone with more brain than a protozoan, but the thing that wasn’t clear was the actual form of the wood surface beneath the bark. The bark was protecting the surface of the kuksa-to-come during the hard work but at this point it would be more useful to remove the bark to see the exact form of the burl underneath it. This would help me to estimate the correct thickness of the wall so that I wouldn’t accidentally make my kuksa into a fancy wooden sieve. So a few puukko-swings later it came clear that the wooden surface under the bark was actually quite where it ought to be.
Once I got started I was pulled deeply into the project. It was in a way actually quite fascinating to make my own kuksa at last so I easily spent most hours of the firts weekend crafting. Or actually I had to spend because I only seldomly would have access to that kind of workspace. The finishing of the kuksa could be delayed weeks – even months – if I didn’t chisel the burl like a rabid beaver.
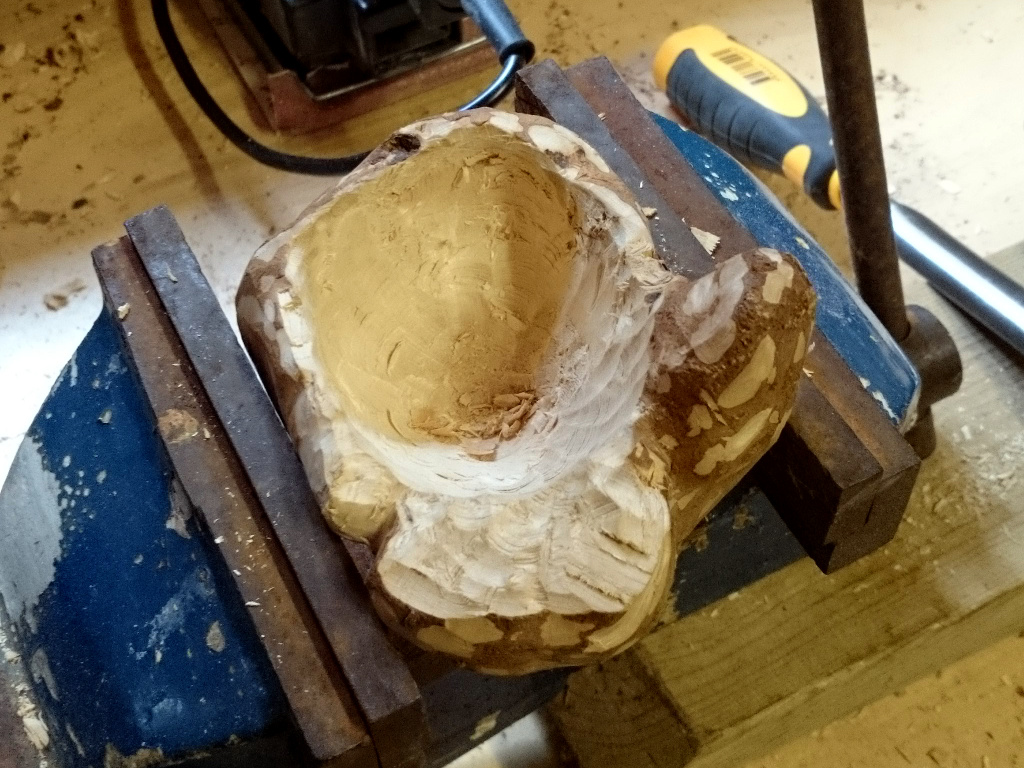
Getting somewhere

The tool for “stabilization”. Sandpaper is modern era so basically it’s cheating!
Nature by the way doesn’t make burls so that they stand steadily on their own. This was basically the only part where I had to “cut corners” (pun intended): I had to cut the bottom flat so that the kuksa would be stable and that the precious caffeinated beverage wouldn’t spill all over when kuksa is placed on a flat surface. For this “stabilization” I used a carpenters saw to get a good area of the bottom somewhat flat and tried to finish it with a belt sander machine (which is cheating(!!) by the way). Using belt sander took time and still the result was only poor and roundish, so after wasting my time with a power tool I got an idea to staple a piece of sandpaper on a straight piece of board to rub the kuksa against this “flattening tool”. It actually worked pretty well and in a few minutes I had made my kuksa perfectly self standing with no wobble of any kind. Besides this sandpaper cheating I wouldn’t be smoothing the kuksa in any way using modern equipment. Instead I would use another dull piece of wood to “seal” the surface of the wood, but more of it later.
Being that sunday is a rest day I felt like letting my mind rest in making the kuksa. I managed to carve the kuksa hollow enough to test my Mora spoon carving knife which turned out to be more tricky than one would expect. The only safe way for using this knife to achieve a smooth carving surface was to actually use the knife like an ice cream scoop. I was carving with a twist, I’d say: The movement was only about the twisting of the wrist to have the force and the range of motion under control so that in case of the blade slipping out of the kuksa I wouldn’t have all the arms’ force involved resulting in a huge swing of a blade and possibly an acute accidental blood donation. Anyhow the key to smooth interior was to carve cross the fibres of the wood, but as the fibres themselves didn’t seem to always know where they’re pointing to, the result wasn’t spotless. The parts where I didn’t have any other choice but to carve in the direction of the grains ensured that the fibres get torn off instead of cut off even with the sharpest of knifes. Some parts might have been a bit tricky but in the end most of the results were satisfying.
During the quick experiment with the finishing knives I noticed that the soft-as-iron-touch of the vise hadn’t actually made a single noticeable scratch in the surface of the burl. The burl was so tough that I wouldn’t be surprised if it had damaged the vise! Anyhow even if there was some imperfections that my eye didn’t catch those would be gone after I’d finish the surface.
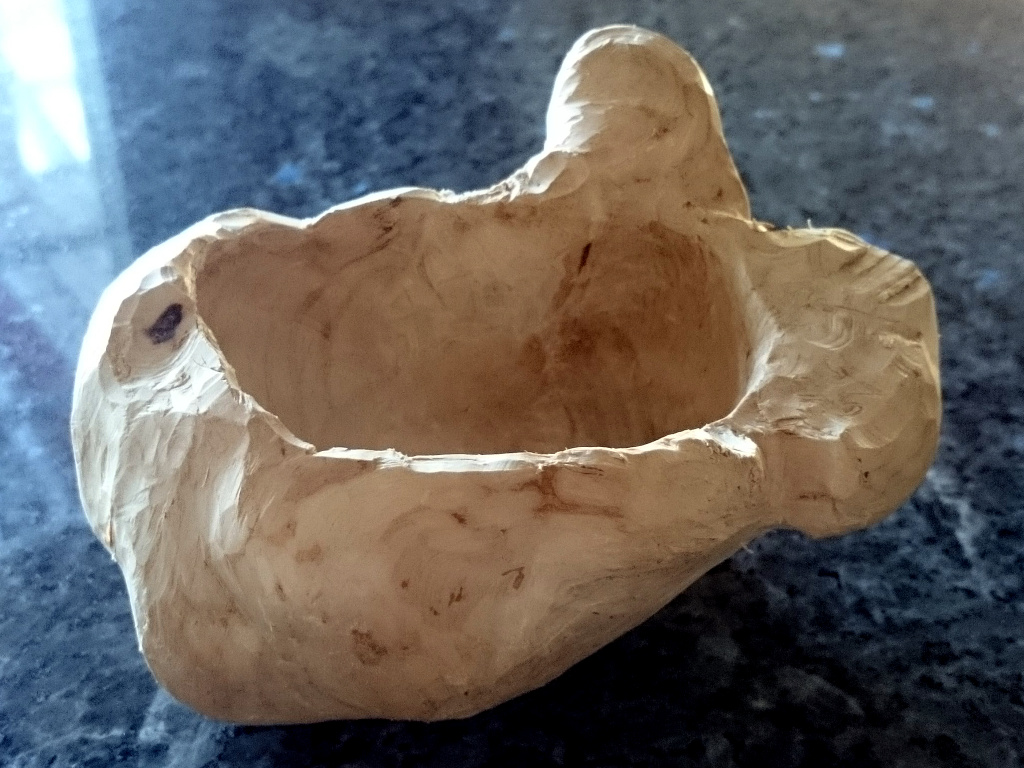
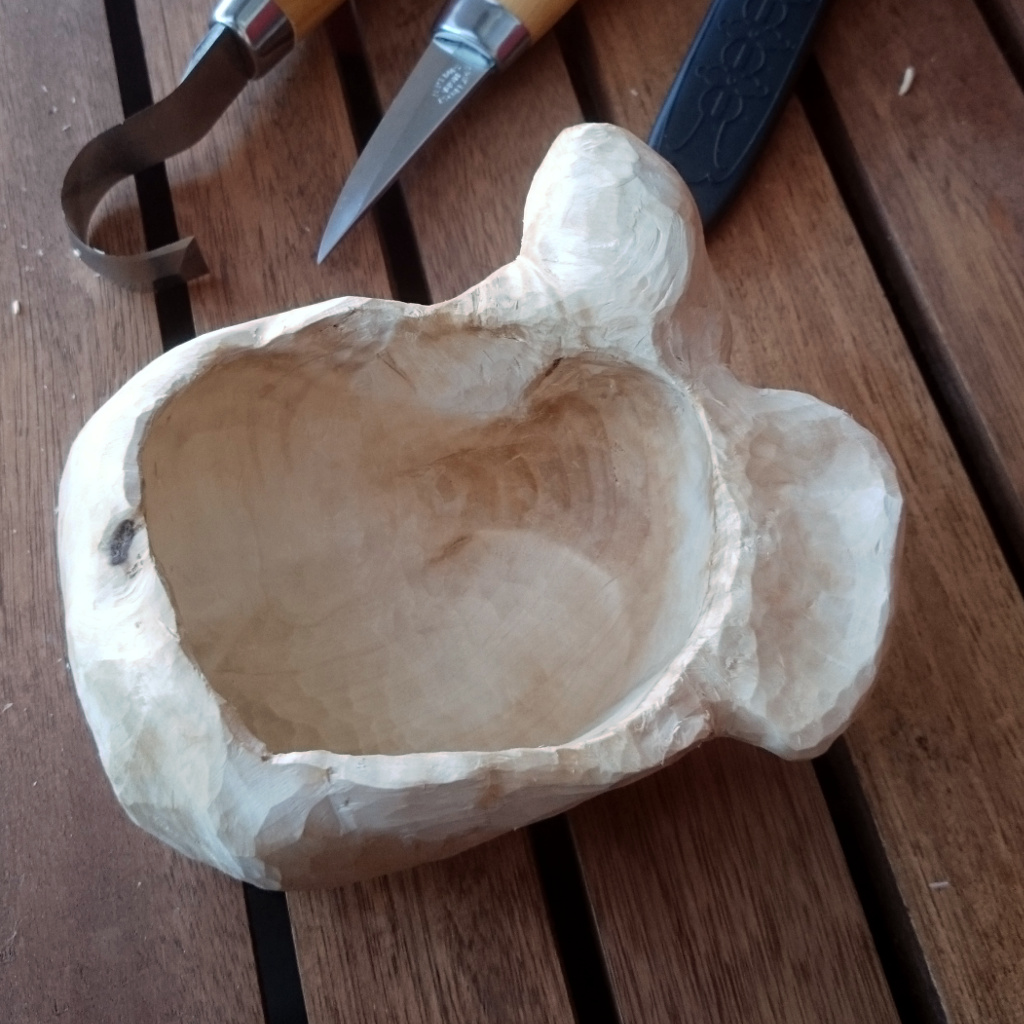
Roughly finished kuksa
It’s not about the size of the blade but how you use it
Back home I worked on the kuksa as much as my other activities and limited workspace made possible. This means that when I got back into the actual workspace the kuksa hadn’t taken a single step forward. Damn it. After finishing the interior part and some concave parts of the outerior with the spoon knife I finished the outer surface with the precision knife. In this point the strangely deformed “handle” part got it’s fair share of beauty that Marttiini couldn’t deliver with it’s longer (and more dull) blade. Even though I’m a fan of huge phallic symbols survival knives, and I usually carry a Kizlyar DV-2 on my hikes as it is a tool that can handle almost anything you can imagine throwing at it, I still recognize that the small bladed knives also have earned their reputation.
During the finishing phase I tought that it would be best to follow the curves and shapes that nature had chosen for this burl so all I practically did was just the removal of the bark. The strange handle…ish part also originated from the shape mother nature had earlier given to it. In some point I had visions about holes in the handle and some reindeer bone inlay details (at least I wasn’t visioning about mammoth bone altough you can buy everything online nowadays) but in the end I realized it would be fitting and even symbolic somehow if my first kuksa didn’t have anything complicated in it. So for the sake of lack of skill simplicity I decided to make it as natural as possible at this point. This would fit nicely into the line of my traditional ideology that also didn’t include any kind of oiling finish that many use nowadays for their kuksas. So no bone details or holes on the handle or even the leather lanyard as I’ve never felt good with hanging my kuksa outside my backpack or on my belt. This was my way of honouring the rare material.
Steel requiring part of the finishing is about done
In many cases kuksa makers recommend to boil the carved kuksa (or the burl right after removing the bark) in salted water. Boiling in salt water allegedly removes some inner tensions that together with constant changes in humidity would somehow result in cracking. I don’t consider these claims entirely plausible because it’s yet to be explained clearly that how exactly boiling and/or salt remove mechanical tension. Instead of this I find it much more believable that the salt introduced in the wood would stabilize the changes in humidity and thus prevent cracking. Due to the hygroscopic nature of salt it should prevent the wood of a kuksa from drying up too much in between moistening effect (humidity peaks) of the beverages being consumed from it. I have no scientific research behind my claims whatsoever so we’re not about to make any kind of factual statements here about why boiling water salt bath might be or might not be good for your kuksa or you. This was just a sidenote.
In the lack of proper explatation (“seems to work” isn’t one) for the salt water bath I decided to leave it out of the equation. I also didn’t want first one or two or hundred cups of coffee to taste salty and besides that kuksa was already dry as ever and still didn’t have any kind of cracks. As far as I know cracking would most likely occur IF the kuksa wasn’t made of round cup-shaped burl. Timber or board wood (or even a non-suitable burl) that has its grains going straight through the cup instead of following cup’s form in a curved fashion is not as solid as it a proper cup-shaped burl is. Although there wasn’t any absolute certainty for my kuksa not to explode into tiny pieces the second I poured some coffee in it I was pretty sure that I’d be getting somewhere with this.
When searching for information regarding ways of crafting a kuksa I found out that some of “ye olde” makers have been favouring “massaging” the knife finished surface with dull pieces of hard wood instead of finishing it with sandpaper. Hard wood would allegedly close the fibre ends for more moisture resistant result whereas sandpaper would just make the fibers ends more fine leaving the surface as open to moisture as it originally was. This argument was enough to make me rub my kuksa with another piece of birch and as I was expecting this also polished the kuksa nicely. Although it only took a few sentences to describe this polishing phase it took me two to three hours to go the kuksa somewhat through and still the results would’ve been better if I’ve had the energy to continue to rub for hour or two more. You see the burl was harder than the “basic” birch so it was more of the burl polishing the polishing pieces than the other way around. Perfect polishing also requires a somewhat smooth surface to begin with and my kuksa was all but smooth cos I finished it with a knife.
In internet many kuksa purists also remember to CAPSLOCK that one shouldn’t impregnate the kuksa with any kind of oil or whatever poison they’d choose. Many commercially manufactured kuksas actually have some kind of oil finishing, which is perfectly fine if you aren’t a friend of principles, but I didn’t feel like dipping my precious creation into any other than coffee or whatever beverage I’d be consuming from it. Speaking of which…
Caffienating & introduction
After surface finishing there would still be a kind of impregnation before the actual introduction. Here introduction means some kind of “initation”, or “breaking” the kuksa into use or baptizing it in a way. In my humble opinion the most traditional way of introducing the kuksa into use requires using both coffee and a distilled beverage, of which the former is needed in the actual impregnation and the latter in the introduction “ritual” you could also call “a vainglorious desire to baptize the kuksa using scotch”.
I brewed some filtered coffee to celebrate my newborn kuksa. After drinking the coffee (not from the kuksa, though) I took some moist used ground coffee from the paper filter to use them to impregnate the kuksa: I rubbed the interior of the kuksa with something like a teaspoon worth of ground coffee until the coffee felt somewhat dry in my fingers. According to the “legend”, and to common sense too, this makes the little amounts of fat in coffee to impregnate the surface of the wood making the wood more moisture resistant. I repeated this step a two or three times and always with a fresh moist spoonful of used ground coffee. The next morning I decided to go it yet through a few times and also to rub the outerior too to give it a nice colourful touch and a little bit moisture resistivity. This way the outerior wouldn’t have so perverted contrast with the interior as they were now basically the same colour. The kuksa was now all done to be introduced for use.

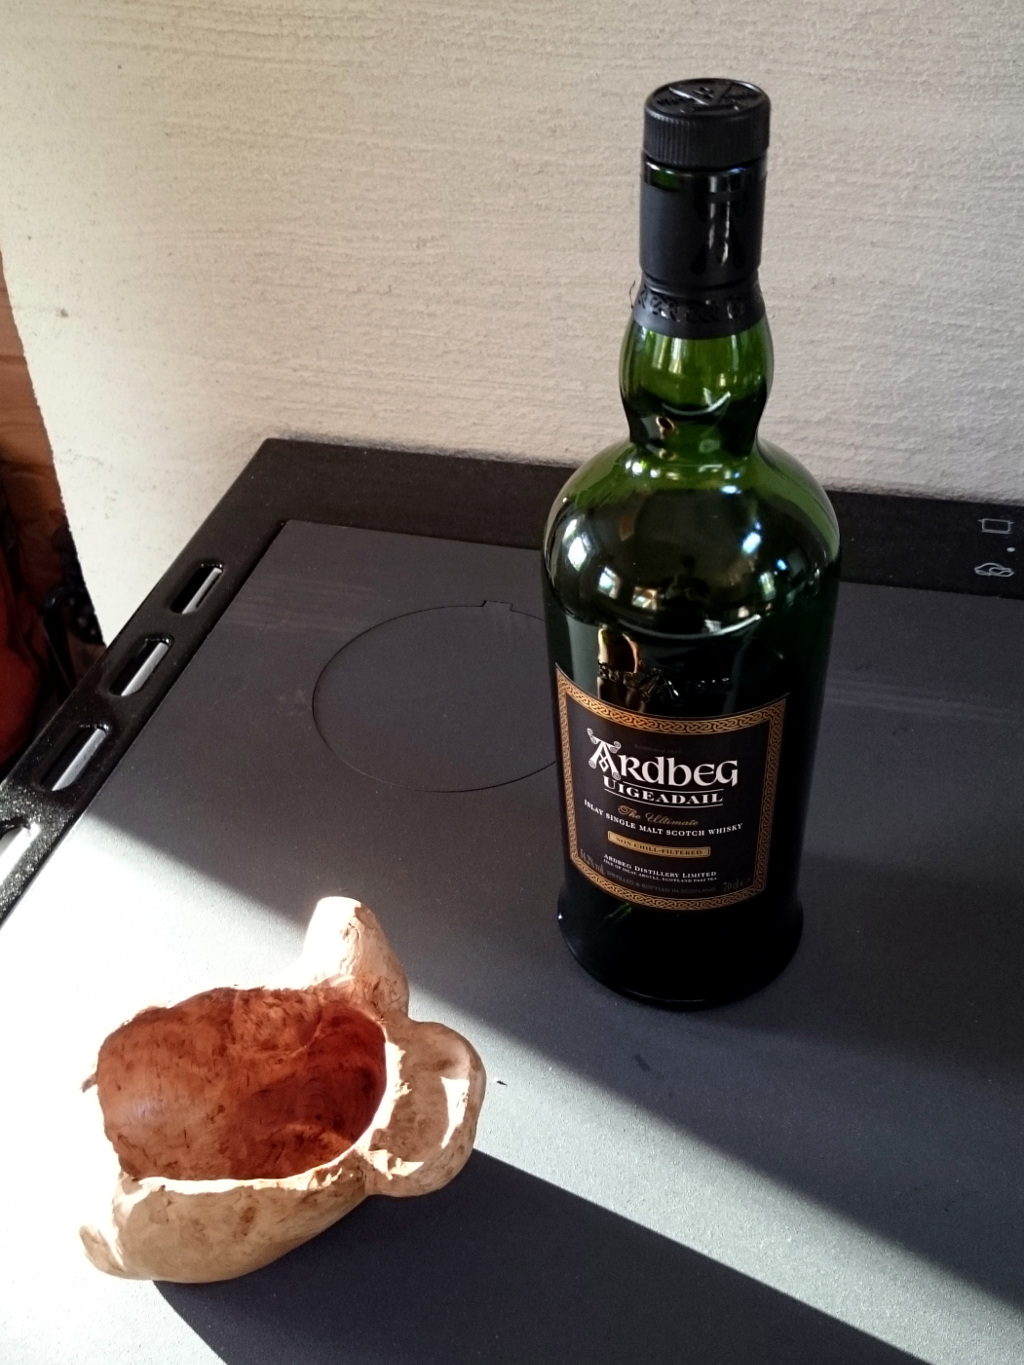
This might be or might not be what it looks like depending on how you see this
The actual introduction ritual is the part that requires the long awaited alcoholic beverage. They usually favour quality cognac with kuksas, but because I like alcoholic beverages distilled of grapes about as much as I like my nails being pulled off, I chose whiskey. Due to the summer’s lack of rain, darkness and other overall autumnish sadness my stash of whiskey only had one bottle, being Ardbeg Uigeadail, which I cannot pronounce aloud because I’m not a drunken scottish gnome. Anyway choosing one out of one bottles was pretty easy even for me.
[Note: The following magic ritual was taken from the Wikipedia itself, which by the way is considered reliable enough to be considered as an inacceptable reference for academic bachelor’s thesis. The ritual was described in finnish article for kuksa, but there is no way of checking the originality, traditionality or any other nuances regarding the act itself. The most important part however is that we atleast have an excuse to use whiskey here, because it was mentioned in the article!]
So let’s get to the black magic part:
1. A sip of beverage was to be poured in the kuksa
2. The kuksa was to be moved clockwise in a circular motion so that the beverage makes a small whirlpool and rises towards the edges of the kuksa (My own kuksa was a little deformed so the whiskey didn’t run exactly smoothly like this but I still managed to get this done).
3. Then the sip was to be… well, sipped.
4. Steps 1.-3. were repeated but this time moving the kuksa counterclockwise in a circle.
5. Finally beverage was to be poured in the kuksa the amount that one desires. No acrobatics needed this time, just take a fair taste of your choice of beverage.
It surprised me how well the smoky whiskey covered all the taste of the coffee and the wood itself. There wasn’t a doubt that this whiskey was quality stuff. The next day I finally enjoyed the very first coffee from this kuksa and the experience was somewhat towards irish coffee. But it wasn’t bad! The residues of whiskey would dissapear after a few cups of coffee.
Remember when photographing near reflecting surfaces that wearing just a birthday suit isn’t advised. I remembered, so no unintentional acts of random nakedness here!
Lastly
The kuksa was now finished and formally introduced into use. There are totally excessive amounts of beverages to be enjoyed from this to further enjoy the outdoors.
Regarding the “user manual” a kuksa is a fairly simple piece of outdoor kitchen, because a kuksa should never be washed. Never ever! Why so? Because it just isn’t allowed to be washed. The only exception to this rule is a real fell river and all the other tries to wash a kuksa lead to misfortune according to the demigods of outdoor activities. But if you’re not-so-superstitious you can rinse your kuksa with warm water after use. Just don’t use any detergent as it isn’t good for your kuksa nor the environment. Besides this you should drink your firewater straight from the flask, not from the kuksa, to prevent dissolving the protective coffee fats. Also dairy products, food and other stuff that goes easily bad should be kept away from the kuksa if the user doesn’t wish to have diahrrea or gastroenteritsis.
There will be many kilometers of hiking ahead with me and my kuksa. At least it’s got to be some kind of sign of good luck to still have all my fingers left after this project. I hope some day to get to craft another kuksa as handcrafting is always so rewarding and like in trekking it’s the trek itself that’s at least as enjoyable as making it to the finish line.
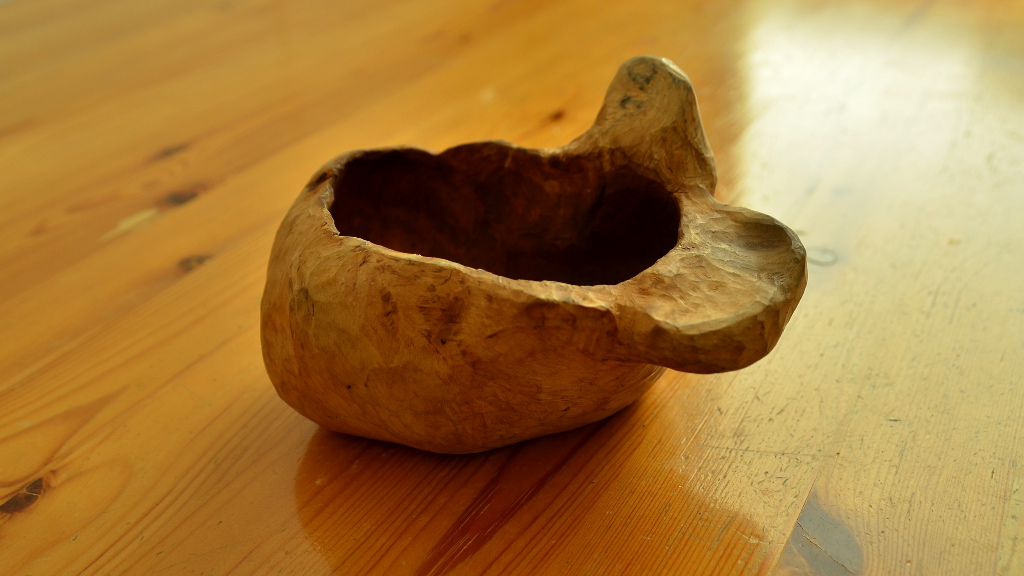
Finished kuksa that has served me well for two years at this point
Learn more:
Kokovartalokommando Youtube channel (videos with English subtitles)
Read this article in Finnish here
Related Content


Leave a Reply
Want to join the discussion?Feel free to contribute!